Lesson 1: Introducing our tech stack
Overview
Introduction
Welcome to lesson one of our course. In this lesson, you will get introduced to the structure of the course, set up your computer, and get to know your peers. The main goal of this lesson is to get your computer and accounts completely set up for the remainder of the course. If you have any issues at all during computer setup, reach out to your instructor sooner rather than later so that you can get them resolved and not fall behind.
Topics for this lesson:
- Course introduction
- Setup computer and accounts
- Get to know one another
Learning Material
Resources for this lesson are accessible to you in this repository
Course Setup
This week's reading will include more direction than most in an effort to get everyone set up for the course. For any of the following that you have not worked with before or need to set up for this class, please go through the installation and setup instructions for each.
You may choose to download and install VS Code from Download Visual Studio Code. You may also watch the following media content that includes helpful tips and tricks to help you work efficiently with this program. If you prefer, you may work with another text and code editor or IDE of your choice.
The following video may be helpful but is not required.
Download Microsoft Teams to download and install Microsoft Teams on your computer. Microsoft Teams will be used for all course communication, discussions, troubleshooting, and collaboration. Once you have installed it, you will need to sign in with your BYU-Idaho email address. After logging in, you will see our class team in your list of teams.
Before you get started in Microsoft Teams, please take a moment to read about Microsoft Teams productivity tips and etiquette here.
What is Node.js
Node.js is an open-source, cross-platform, backend JavaScript runtime environment that runs on the V8 engine and executes JavaScript code outside a web browser.
In short, it is JavaScript that can do a lot of incredible things. It is very commonly used for backend web development. We have the frontend which consists of HTML, CSS and a bit of JavaScript. We also have some sort of database where data is stored long-term. And we have some backend system that will connect the frontend to the database. This is what we will use Node for in this class.
- Open the official page for Node.js downloads and download Node.js for your operating system.
- Run the downloaded Node.js Installer, including accepting the license, selecting the destination, and authenticating for the install. This requires Administrator privileges, and you may need to authenticate.
- To ensure Node.js has been installed, run node -v in your terminal—you should get something like vx.x.x
- Update your version of npm with npm install npm --global. This requires Administrator privileges, and you may need to authenticate
- Congratulations! You now have Node.js installed and are ready to start building!
Almost all of your code assignment submissions in this class will include a YouTube video link. You will use this video as an opportunity to demonstrate the tasks mentioned within the rubric of the individual assignments. As part of the course setup for this class, please ensure that you have a YouTube account created. If you need help doing this, this Google search for how to create a YouTube account may help.
If you have never recorded a video of you sharing your screen while recording your voice, that is okay. There are many free resources that allow you to create such recordings. Here are a few popular ones:
GitHub is essentially a big database of source code for people all around the world. You can make your source code public or private and configure many different permissions and settings. Each project has its own repository, or "repo". This repository will be a clone of the one on your local computer. Thus, you will have three copies of your code:
- On your computer
- GitHub
- Render starting in lesson 2
Install Git
- If you haven't before, you'll need to and install git. If you already have git installed, skip to this step.
- Go to git-scm.com and choose the appropriate download for your operating system.
- Run the installer with the default settings (Windows: ensure that git will be added to PATH) and wait for the installation to finish.
- Restart VS Code if you have it open, and open a new terminal window by selecting New Terminal inside of the Terminal menu.
- In your terminal, execute
git --version. - If "git --version" produces an error, make sure git has been added to your PATH environment variable, then restart VS Code.
Instructor Tip:
On Windows, Git is usually installed at
C:\Program Files\Git\cmd. This is the location that should be added to your PATH.
Git Setup Video Demonstration
The following video may be helpful but is not required.
Create a new repository
All information and videos about setting up GitHub for this class can be found on the GitHub page.
What is MongoDB?
MongoDB is a source-available, cross-platform, document-oriented database program. Classified as a NoSQL database program, MongoDB uses JSON-like documents with optional schemas.
For all of our projects this semester, our database for our data will be MongoDB.
Create MongoDB Account and Cluster
- Navigate to the MongoDB Atlas Site
- Select Start Free
- Fill out your email, name, and password to create an account.
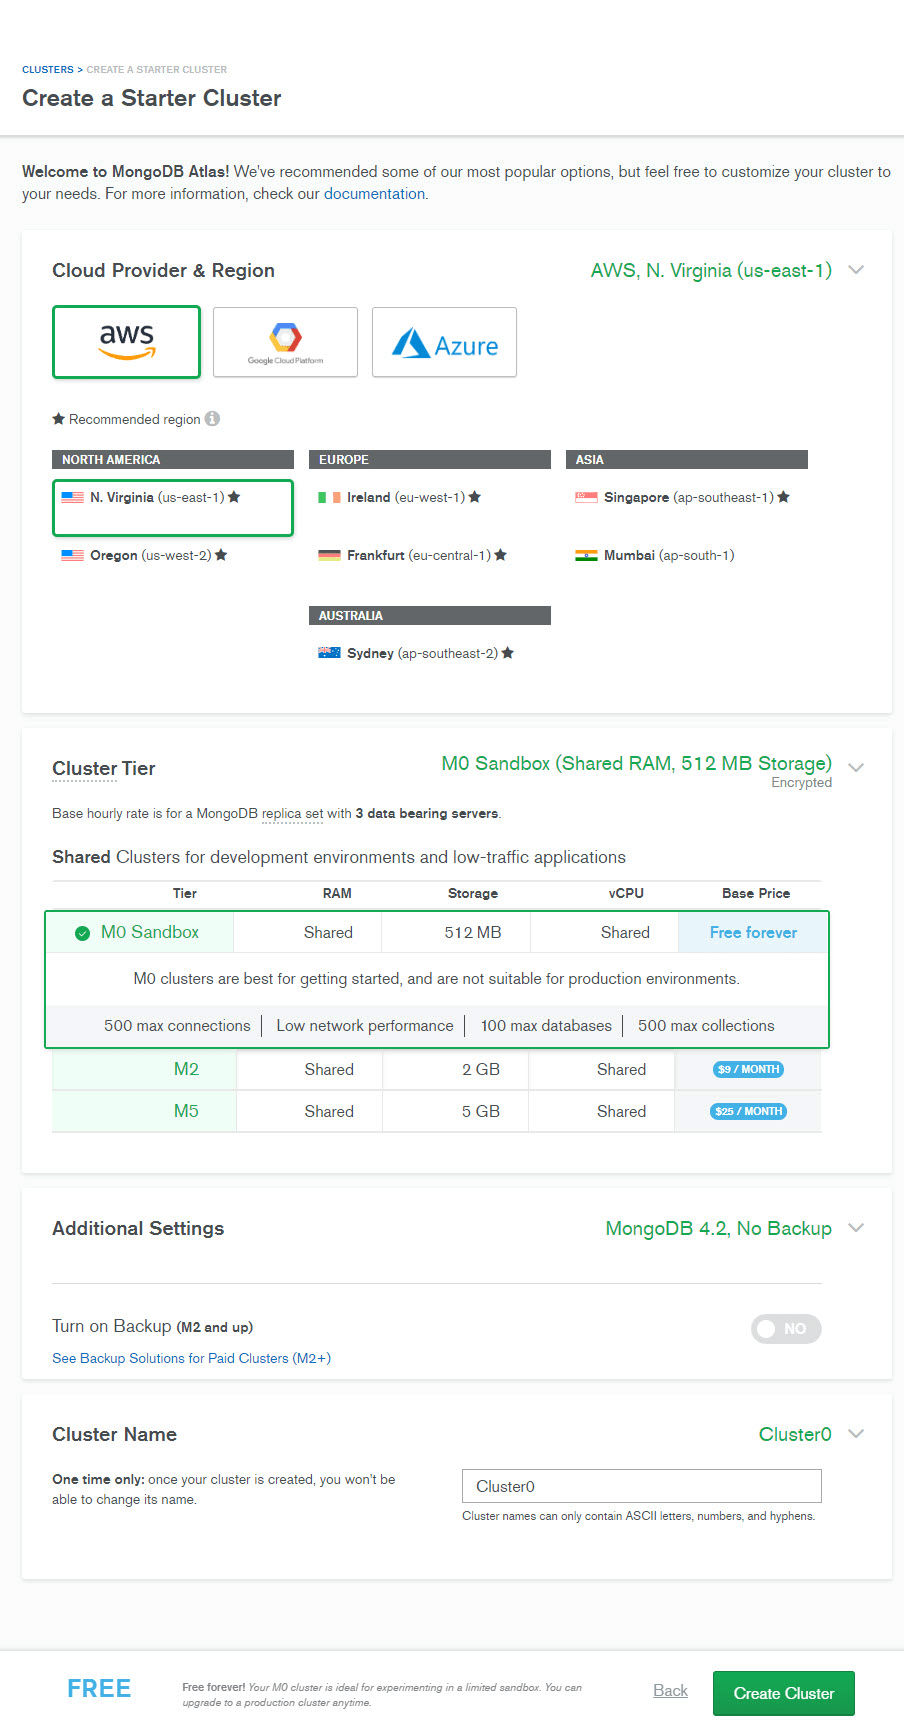
- Choose the free option and select Create a Cluster
- Ensure that the configurations for the new cluster look similar to the following image and have the free options selected.
- Your account is now ready to go. You will not need to create another database account or cluster. During the semester, you will be able to add collections of data and manage this database, so make bookmarks where needed.
If you are having issues with this, please watch the following video from January, 2023:
The following video may be helpful but is not required.
All information and videos about setting up Render for this class can be found on the deployment page.
Getting started with our first APIs
The following content may be helpful but is not required. Please see the syllabus for more details.
Getting started with Node.js
This course is an API development course. An API is defined as an application programming interface, or a connection between computers or between computer programs. In web development, APIs or Web Services allow us to request data from a server (in our case, a Node.js project), which will then get data from a database and send back to the frontend whatever data they requested. This is what APIs and Web Services do.
We will build robust, secure backends that will work with websites, mobile apps, wearable apps, and many other things. We will create data endpoints that will simply deliver data to any frontend when requested.
Seeing that this entire course will use Node.js, which has officially been coined as "JavaScript on steroids" by the author of this course, if you feel you may need a JavaScript refresher before diving in, the following video is a good one. From there, feel free to search Google or YouTube for individual concepts that still aren't clear.
There are many different tech stacks and languages that can handle API development in the way that we are going to do. Some popular ones include Node, C#, Java, Ruby, and Python. More important than learning any one of these is learning how to create web backends. Once you've learned one, the rest will come with relative ease.
In this course, we will use Node.js as our backend technology of choice. To prepare you for your assignment this week, here are some helpful resources to start learning Node:
- Node and Express Tutorial
- Node docs
- (OPTIONAL) YouTube: Node.js Tutorial for Beginners: Learn Node in 1 Hour
- (OPTIONAL) YouTube search: nodejs for beginners Even a simple web search like "nodejs web server example" can be extremely helpful.
All information and videos about saving to GitHub for this class can be found on the GitHub page.
All information and videos about publishing an API to Render for this class can be found on the deployment page.
At this point in the lesson, you may likely be completely lost, confused, stressed, frustrated, or worried. Please remember, that this course is designed to help teach you how to find answers and information independently. With that said, you have solutions for these first four lessons, and I've added one more video for lesson one to help you learn a bit about node. Enjoy. :)
The following video may be helpful but is not required.
Team Assignment
Overview
Purpose: Become acquainted with your peers.
Task: Complete the assignment.
For this lesson's team assignment, you will get to know your peers. Post an introduction of yourself to the course Introductions channel with five pictures: one of you, and the rest of things that are about you or are things that you care about. Then respond to five of your peers by the end of the lesson.
Personal Assignment
Overview
Purpose: Publish API to the web.
Task: Complete the assignment.
Learning Objectives
By the end of this assignment the student will be able to do the following:
- Create a Render Link that is accessible, error free, and data is viewable on home page
- Create a node.js project that shows code for route that displays a name upon request of the home route
- Create a GitHub repository that has a node.js project containing folders called "routes" and "controllers"
Assignment Description
If you have not already, create a GitHub repository for your work. In this class, you will never submit code of any kind; you will always submit links to your work. You will always use the following tools:
- GitHub to store your code
- Render to deploy your code
- YouTube to demonstrate the functionality of your code
- Create a GitHub repository
- Use npm init to start a new node project from scratch
- Create a web server
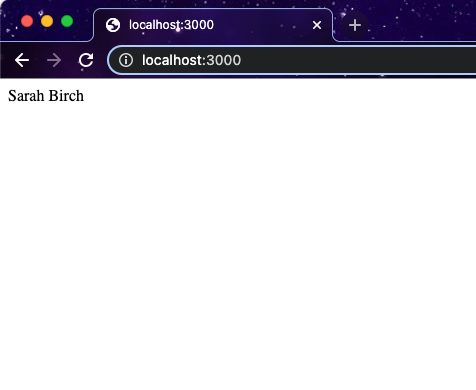
- Create a route in your server that will return your the name of someone you know. If requested through the browser, you should see this data on the screen as shown in the image below:
- Push to GitHub.
- Publish to Render.
- Create a brief video demonstrating the functionality of your assignment. Upload it to YouTube (public or unlisted).
- Submit GitHub, Render, and YouTube links in I-Learn.
- Be sure to review the rubric below to see how you will be graded on this assignment.
Rubric
| Criteria | Weight | Mastery | Proficient | Developing | Beginning | Missing/Incomplete |
|---|---|---|---|---|---|---|
| 100% | 90% | 78% | 65% | 0% | ||
Deployment(Graded via Render) | 40% | Meets Proficient criteria and application shows data (name of someone you know) on the home page | Meets Developing criteria and there are no Render log errors | Meets Beginning criteria and Render link can be viewed in the browser | Render link provided | Render link not submitted |
Functionality(Graded via YouTube) | 30% | Meets Proficient criteria plus application displays name when home route is requested | Meets Developing criteria plus no errors are present (and no "Cannot GET /" message) when accessing Render home url | Meets Beginning criteria plus Code Repository shows code for '/' route (Render home url) | YouTube link submitted and Node.js project is presented | YouTube link not submitted |
Architecture(Graded via GitHub) | 20% | Meets Proficient criteria plus application has a folder called "controllers" that has functions for each route | Meets Developing criteria plus application has a file in the "routes" folder called "index.js" | Meets Beginning criteria plus application has a folder called "routes" that includes all routes for assignment | Node project created and present in GitHub repository | GitHub link not submitted |
Presentation(Graded via YouTube) | 10% | Meets Proficient criteria and video is less than 1 minute | Meets Developing criteria and video shows GitHub code | Meets Beginning criteria and video shows the home url data (name of someone you know) | YouTube link submitted | YouTube link not submitted |